How to Do Kettle Stitch Binding? Easy Steps for Perfect Bookbinding
How to do kettle stitch binding? To do kettle stitch binding: Thread a needle with waxed thread. Sew through signatures’ holes, linking the last stitch of each to the previous signature’s loop with a twist (the kettle stitch). Pull snug. Repeat along the spine for all signatures, tying off at the end for a secure, flexible binding.
If you’ve ever wanted to create a book that looks professional and lasts for years, learning how to do kettle stitch binding is a great place to start. This simple but strong sewing technique lets you connect pages neatly without the need for expensive tools or complicated steps.
Imagine holding a handmade book that feels sturdy and beautiful—wouldn’t that be something you’d want to create yourself? Keep reading, and you’ll discover easy, step-by-step instructions that make kettle stitch binding clear and doable, even if you’ve never tried bookbinding before.
How to Do Kettle Stitch Binding?

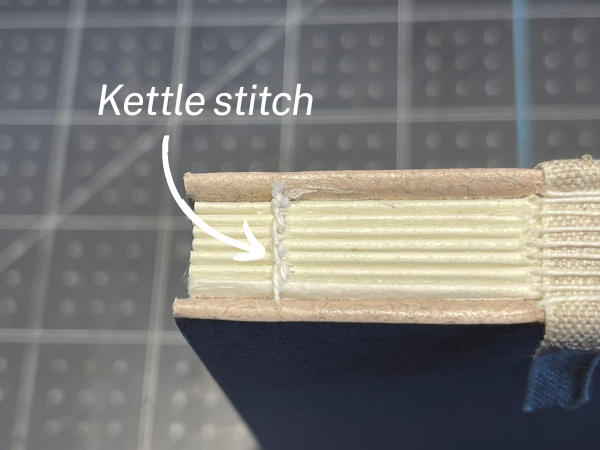
Credit: grecianneedle.com
Materials Needed
Gathering the right materials is the first step to start kettle stitch binding. Each item plays a key role in making your book strong and neat. You do not need many tools, but quality matters.
Organizing materials before you begin saves time and keeps your work smooth. Below are the essential items for kettle stitch binding.
Needle
Choose a strong, long needle. A tapestry needle with a large eye works best. It helps to pass the thread easily through the paper and signatures.
Thread
Use waxed linen thread. It is strong and does not tangle. Wax coating helps the thread slide smoothly through holes.
Signatures
Signatures are folded sheets of paper. Each signature forms part of the book’s pages. Make sure the paper is thick enough for your project.
Awl
An awl makes small holes in the paper. These holes guide your needle and thread. Sharp and pointed awls work best for clean holes.
Bone Folder
A bone folder helps crease paper sharply. It makes folding signatures easier and neater. This tool improves the book’s final look.
Clamps Or Weights
Clamps or weights hold your signatures together. They keep pages from moving while sewing. Use something heavy but gentle to avoid damage.
Cutting Mat
Protect your work surface with a cutting mat. It also helps when making holes or trimming paper. A self-healing mat is ideal for durability.
Preparing The Signatures
Preparing the signatures is the first step in kettle stitch binding. Signatures are groups of folded pages. These pages will be sewn together to create the book. Careful preparation helps the binding look neat and last long.
Start by choosing the right paper. Use paper that is not too thick or thin. Thick paper can be hard to fold and sew. Thin paper might tear during sewing.
Folding The Pages
Fold each sheet of paper in half carefully. Use a bone folder or the back of a spoon. Press firmly along the fold to make a sharp crease. This helps the pages lie flat inside the book.
Grouping The Signatures
Group the folded sheets into sets. Each set should have the same number of pages. Usually, 4 to 6 sheets per signature work well. Make sure all signatures are the same size.
Aligning The Signatures
Stack the signatures carefully. Check that all edges line up evenly. Use a clamp or heavy book to keep them in place. This prevents shifting while sewing.
Setting Up The Kettle Stitch
Setting up the kettle stitch is the first step in this traditional bookbinding method. It prepares your materials and ensures a strong, neat finish. Careful setup makes stitching easier and more precise.
Gather all supplies before starting. This saves time and helps keep your workspace organized. A clean setup improves your focus and results.
Gathering Materials
Collect the signatures or folded pages you want to bind. Use a sturdy needle and strong thread for durability. Prepare an awl or small tool to punch holes.
Align all signatures neatly. Clamp or press them to hold tightly together. Mark evenly spaced sewing stations along the fold line. This guides your stitching.
Making The Holes
Use the awl to punch holes through each signature at the marked points. Make sure holes line up perfectly across all pages. This step is crucial for smooth stitching.
Threading The Needle
Cut a length of thread about three times the book’s height. Thread the needle and knot one end securely. This prevents the thread from slipping during sewing.
Credit: www.youtube.com
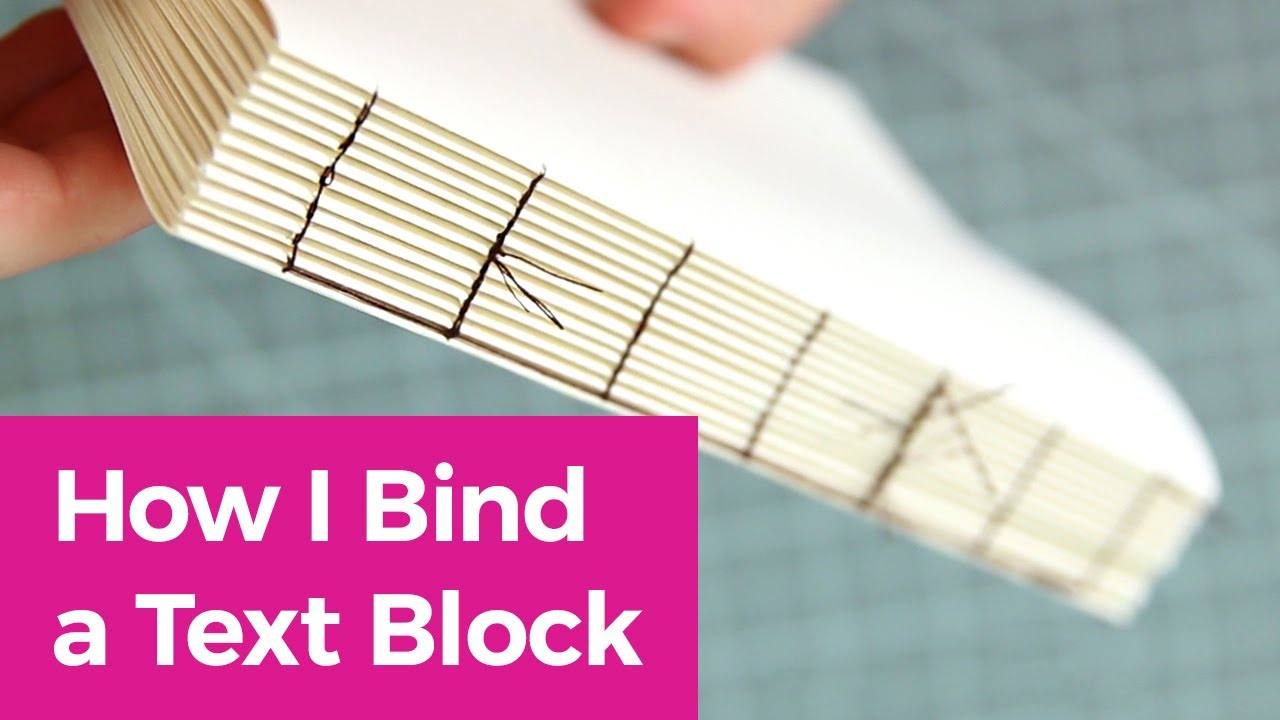
Sewing The Signatures Together
Sewing the signatures together is a key step in kettle stitch binding. This process joins the folded paper groups, called signatures, to form a strong book block. Proper sewing keeps the pages secure and allows the book to open flat.
Each signature needs careful stitching to ensure durability. The kettle stitch creates neat, visible knots on the spine. These knots hold the signatures tightly while adding a classic handmade look.
Sewing Setup And Tools
Prepare your sewing station with all tools within reach. You need a sturdy needle, strong thread, and an awl to make holes. Use linen thread for the best strength and flexibility.
Mark sewing holes evenly along the spine of each signature. Use the awl to punch holes through the folded edge. Make sure holes line up across all signatures.
Joining The First Signatures
Start by threading the needle and tying a small knot at the end. Pass the needle through the first hole of the first signature. Leave a short tail to tie later.
Attach the second signature by looping the thread through its first hole. Pull tight but not too hard to avoid tearing paper. Continue stitching through each hole in order.
Creating The Kettle Stitch Knots
At each sewing station, wrap the thread around the previous loop. Pull the thread to form a knot between signatures. These knots lock the signatures in place securely.
Keep tension steady to maintain even stitches. The knots should sit flush against the spine without gaps. This technique strengthens the book and adds a decorative touch.
Finishing The Sewing Process
After sewing all signatures, tie a firm knot with the thread tails. Trim excess thread close to the knot. Press the spine lightly to flatten the stitches.
Check the book block for loose pages or weak spots. Adjust or reinforce stitches if needed. Your sewn signatures now form a solid base for binding.
Finishing Touches
Finishing touches bring your kettle stitch binding to life. They make your book strong and neat. These final steps protect your work and improve its look. Take your time here. The details matter.
Cleaning Up Loose Threads
Cut any extra thread close to the knots. Use sharp scissors to avoid fraying. Tuck thread ends inside the fold or under stitches. This keeps the book tidy and safe. Loose threads can catch and pull, so clear them well.
Pressing The Book Flat
Place the book under a heavy weight or press. Use clean paper between the pages to avoid marks. Press for several hours or overnight. This flattens the pages and tightens the binding. A flat book feels better and lasts longer.
Adding A Protective Cover
Choose a cover that fits your book size. You can use cloth, leather, or decorative paper. Glue or sew the cover carefully to the spine. A cover shields the pages from dirt and damage. It also gives your book a polished look.
Credit: blog.papercraftpanda.com
Frequently Asked Questions
What Materials Are Needed For Kettle Stitch Binding?
You need needle, thread, folded signatures, and a bookbinding awl for kettle stitch binding.
How Long Does Kettle Stitch Binding Usually Take?
It typically takes 30 to 60 minutes, depending on the number of pages.
Can Kettle Stitch Binding Be Used For Thick Books?
Yes, but it is best suited for thin to medium-thick books for durability.
Conclusion
Kettle stitch binding is a simple and useful skill. It keeps your pages secure and neat. Practice a few times to get comfortable. Soon, your books will look handmade and special. This method works well for small projects. Try it on notebooks, journals, or scrapbooks.
Enjoy the process and your unique creations. Keep stitching and improving each time you bind. Your handmade books will impress friends and family. Keep your tools ready and start your next project soon.
Read More